|
|
|
|
As an introduction to working with
decorative veneers, parquetry has everything to recommend it.
You may not be inclined towards pictorial marquetry, but with
some veneers - like the ones we show here - plus a ruler, and a
sharp knife you can create myriad's of patterns for large
furniture or (just for a start) table mats.
Parquetry is the art of designing and
constructing geometric patterns in wood veneer, using the same
tools and materials as marquetry, but making different demands
on skills, especially in the cutting.
Marquetry calls for a well developed
artistic sense to produce top quality original work. It involves
freehand cutting, and beginners usually start with kits to
develop knowledge of veneers and technical skills before moving
on to their own designs.
Parquetry, on the other hand, will
appeal to everyone who enjoys veneers, particularly if you also
enjoy maths! You will he designing your own patterns almost from
the beginning; there are no kits or recommended designs to work
through. Accuracy is achieved with rulers and jigs, using
measuring and straight-line cutting techniques familiar to all
woodworkers.
|
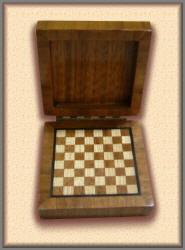
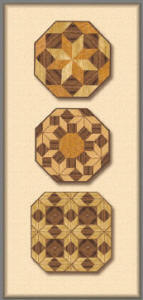
An
example of simple parquetry
design and application |
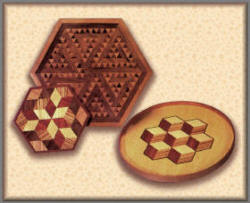
Further examples of parquetry
designs |
You'll find here a series of logical
exercises showing how to produce the basic patterns. Using a
little imagination, you can then develop your own designs and
assemblies, playing mathematical games.
Learning is by doing - and enjoying the
process. As you experiment, you'll find yourself wondering how
to produce specific effects you want. You might start looking
into the elements of mathematics which are the essential
background to the craft, but many people prefer to work out
practical solutions of their own.
Parquetry tools
Since the shapes to be cut - straight
lines or regular curves - are straightforward, use a more robust
style of knife than you would for marquetry, like a Swann-Morton
craft knife with nos. 1 & 2 blades (or other makers'
equivalents). Use an engineer's rule for cutting accurate
straight lines. It is graduated and has two good straight edges,
parallel to each other, which are essential.
|
|
You won't normally require a specific
size. When you do need a specific width, as in tile assembly
(often referred to as "stick as you go" by older members of the
Marquetry Society), you may have to make a metal parallel
cutting guide using a guillotine, or one in 6mm ply using a
panel or circular saw for accuracy. Finish the plywood edge by
hand, using file and sandpaper.
For measuring and setting the angles
required, use clear plastic 90/45° and 60/30° set squares, large
ones for accuracy. Use clear sticky tape for holding veneer
pieces in position and/or joining strips together, but choose a
cheap tape with limited stick, generally found on market stalls.
You can use any wood glue for final
assembly, although PVA is often the preferred glue these days,
and of course it is suitable when you're sticking piece by piece
direct to the baseboard using the 'tile' or 'stick as you go'
method. For generally sticking taped assemblies use Cascamite,
Contact glue, Glufilm or even balsa cement if PVA is not
available.
|
|
Choosing veneers
Limit yourself to a few timber species,
looking for marked contrast in colour and pieces with either
little grain marking or striped parallel grain. I recommend:
|
ash |
ayan |
boxwood |
|
cedar of Lebanon |
cherry |
oak |
|
opepe |
padouk |
purpleheart |
|
sapele |
sycamore |
teak |
|
walnut |
zebrano |
|
|
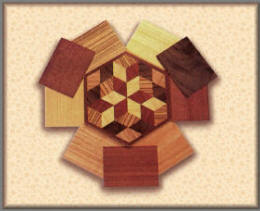
A veneer selection and the
resulting parquetry design |
|
Two parquetry methods are
covered here:
1/. Strip method: all cutting and assembly is done using
strips of veneer. This method is relatively easy, calls only for
the accurate cutting of parallel strips of veneer, and avoids
any build-up of cumulative errors.
2/. Tile assembly method: shapes are cut either in strips or
individually, but assembled piece by piece. This requires
greater accuracy since only small individual mistakes in cutting
will accumulate to produce significant errors.
In each case you need to make simple jigs for repetitive
cutting of parallel strips to a specific size and with accurate
angles.
|
|
Strip method
Make a simple jig for strip cutting from
a plywood or chipboard base (6-12mm thick) with a metal or ply
guide strip about 1 in wide.
Cut the ply strip with a panel or
crosscut saw to produce a straight edge, and then true it with
sandpaper and a file, before pinning and gluing it to one edge
of the hoard as a stop.
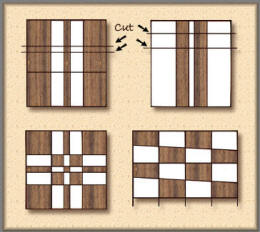
You'll understand how the jig is used if
you follow the stages in making the chessboard pattern (fig. 1).
Place a piece of veneer on the board
against the guide stop, with the grain at 90° to the edge. Place
your ruler on top of the veneer, tight up to the guide and cut a
strip across the grain the width of the ruler.
This first strip is waste unless the
original edge was straight and true. Now repeat the procedure,
cutting a number of parallel strips of the first veneer. Then
you can cut strips of a contrasting veneer.
As you cut the edges take care the
veneer doesn't break out; ease the pressure on the knife or use
a number of gentle cuts.
Try sticking small pieces of tape on the
veneer surface as reinforcement.
|
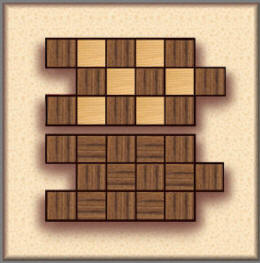
Fig 1.
Top: Cut two contrasting woods to give a "chessboard" effect
Below: The same veneer is cut with and across the grain for an
attractive contrast effect
|
|
For the second stage, tape
strips of the two veneers in an alternating pattern,
with sticky or veneer tape along the joins on the face
side. Feed this composite veneer into the jig up to the
guide stop, using a set-square to check that the strips
are exactly at right angles to the guide. Using the
ruler as before, cut a series of strips parallel to the
guide edge, rejecting the first one as waste. The strips
of squares can now be taped together, displacing them
alternatively to the left and right for the pattern you
want (fig. 1).
This is the basic strip method
technique. By varying the angle of the second cut (60°
and 45° on set squares) and other modifications, we will
show you some examples of this later on in this series.
When you've done these initial
exercises you'll have worked out that there are three
main variables:
a/ the number of different
veneers used
b/ the angle of the second cut
c/ the width of strip used.
By shuffling the combinations
you'll get a vast range of different effects.
Once you've practised this
method and recognise its potential you might want to
construct patterns which can't be built up from simple
strips.
|
|
|
Tile method
You can actually cut some patterns (fig.
7) by the strip method, but others (figs 8, 9) involve geometric
shapes which must be cut individually.
Since both groups are individually
assembled you have to cut really accurately.
The width of squares and diamonds and
hence the length of the sides must be precise and, where angles
join at a point, they must add up to exactly 360°.
To improve the accuracy of angle
cutting, I add a second guide to the strip-cutting jig. It is
pinned and glued at the required angle to the first guide
(generally 90°, 60°, or 45°) depending on the shape you want.
Get the angle absolutely accurate with a
large plastic set square, and allow a gap between the ends of
the guides to suit the width of your ruler.
This second guide enables you to make
sure the angle of the second-stage cut is right every time,
because you check the fit against both guide edges before
cutting each parallel strip.
If you mount guides at different angles
on each side of a baseboard, each base can provide two different
jigs.
Strip cutting
Follow the same cutting technique as you
used for the strip method, but rejoin the strips after the first
cut and then cut the second stage to produce a basic stock of
diamonds or other shapes, all in the same
|
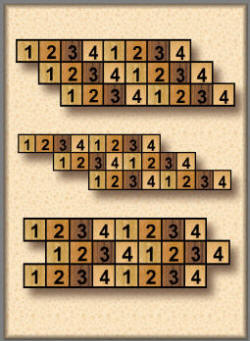
Fig 2:
Use strips of four veneers
taped in sequence
and cut across to get strips of mixed squares;
vary the displacement and even the width of the strips,
and thus the squares. for numerous effects
|
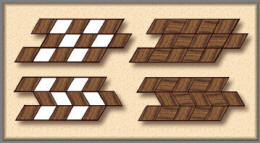
Fig 3: 60°
cutting: at the second stage, crosscut
the strips at 60° to the first cut to produce
diamonds instead of squares - and a whole
new range of patterns. 'Chevron' effects come
from turning alternative diamond-cut
strips end for end
|
I keep them in strip form on the sticky
tape for ease of handling and protection, peeling off individual
shapes when I need them.
You can see various combinations made
with 60° diamonds in fig. 7. I suggest you make up the
single-colour hexagons from three diamonds of the same veneer,
contrasting the grain directions.
When you assemble them, use small pieces
of sticky tape on the face side to hold the individual pieces
together, lining up edges and corners to get a perfectly true
final shape.
I often assemble freehand, experimenting
with the individual shapes until I get the effect I want.
Then I draw the pattern on a sheet of
paper and reassemble over this plan to get it right.
Another assembly technique,
useful when patterns become more complex, is to cover the design
with clear sticky-back plastic, sticky side up, held in place
with a few pieces of tape. It's easier to experiment with and
rearrange shapes on this material than use sticky tape on single
pieces or combinations.
|
|
Above
Fig 4:
A tiny hint of the number of cutting
and taping sequences you can use for manifold chevron effects
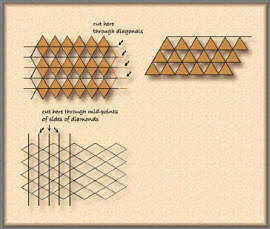
Left Fig 5:
Top, cut the diamonds from fig. 3
diagonally for triangles; top right, reverse alternate strips
for another triangular effect, Above, cut strips of diamonds
through the midpoints of their sides for yet another variation
|
Fig
6:
Top: make two
mirror-image assemblies and
cut three widths of strip and you can get a
pattern like the one above left:
above right, the result of using equal-width
strips but tapering second-stage cuts |
Individual cutting
Now look at the patterns using 45°
diamonds mixed with squares (fig. 8), and you'll notice a new
problem.
In previous designs, once you'd chosen
the width of ruler the resulting shapes all had a common edge
length.
When you start mixing diamonds and
squares, this no longer holds true.
A practical solution to this problem is
to draw the pattern out on a sheet of paper, using the actual
diamonds as a guide to size.
Draw the best square through the tips of
the diamonds; small differences in the cutting and assembly of
the diamonds will lead to a degree of 'averaging' here.
Now you can cut the squares individually
and hand fit them to the pattern; that's how I did these
examples.
This is accurate enough to construct
quite complicated assemblies (fig. 9) but it does take time.
|
|
There is an alternative mathematical
method; make a parallel cutting guide 1.414 times the width of
the ruler used to cut the diamonds.
Thus if the ruler were ¾ in wide, you'd
need a cutting guide ¾ x 1.414=1.061in. Cut a 6mm ply strip to
size and trim it carefully, using a vernier gauge to check the
width.
Assembly and finishing
Normally you should assemble the whole
veneer surface complete with surrounds and borders as a veneer
lay-on, held together with tape ready for gluing down in a
single operation.
|
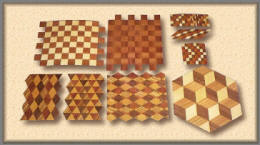
Above, samples of the different cutting methods
|
|
This is straightforward with contact
glue, and no clamping is required. Water-based contact glues
tend to curl the veneer and cause some laying problems, so take
care if you're using these.
You can also use water-based glues such
as Cascamite and PVA, but the veneer will naturally curl when it
absorbs water from the glue. So it must be held flat and in
contact with the base surface with good cramping while the glue
dries.
|
|
For large
surfaces you'll have to use a press or temporary cramping
arrangement with boards and G-cramps, since the forces involved
are quire large.
With areas up
to about one square foot, you can get enough pressure with
weights or even by standing on the board.
I often lay marquetry pictures of this
size by inverting the glued assembly face-down on to a flat
surface and standing on it for 15-20 minutes!
Check the work after 20-30 minutes of
clamping and if there are any bubbles, blisters or wrinkles in
the veneer surface, cover it with brown paper (not newspaper!)
for protection and iron over the surface lightly to press out
air, flatten the veneer and speed the setting of the glue.
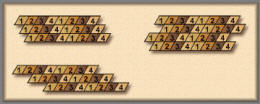
|
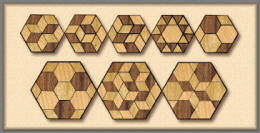
Fig 7: Work on these 60° variations, or make your
own.
Use the same coloured veneer but alter grain
direction for a 'secondary' pattern appearance
|
Above, a mere handful
of the diamond based
patterns you can cut.
|
The reason
you shouldn't use newspaper is that the print, or ink, from the
paper, even though it dry to the touch, can easily transfer
itself from the paper to your work while being clamped.
On medium heat, iron it from the centre
outwards, taking care not to overheat the veneer, or it'll
shrink and crack.
After ironing, press for at least
another 10-15 minutes.
When the glue has dried, sand the
surface: obviously you can't sand wholly with the grain, but
this is no problem if you finish progressively, ending with a
320-grit paper.
You can use any normal clear
woodworking polishes, from matt to gloss, but many people
prefer a satin finish to highlight the beauty of the contrasting
grains, which catch the light at different angles.
Traditionally, parquetry and marquetry
were used to decorate items from long-case clocks and bureaux
down to boxes, table mats, trays and coasters.
|
|
On some items - even long-case clocks -
parquetry was used to cover the whole surface, while elsewhere
it was used as a decorative feature to relieve an otherwise
plain veneer face.
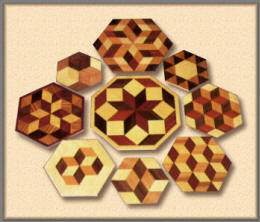
Beware of over-decoration.
Compare the examples shown here, from
the face of the box covered in parquetry to the circular tray
where it's used as a central decorative feature.
You might consider using parquetry as a
decorative feature for other applications, including kitchen
units, internal doors, bedroom furniture, coffee tables,
desk-top accessories, boxes and even personal jewellery.
Although normally laid as an integral
part of the surface, small tasteful decorative features can be
used as overlays on an already existing surface.
Left Fig 8: Mixing diamonds and squares; use the
diamonds you have already cut as a guide for size on paper
|
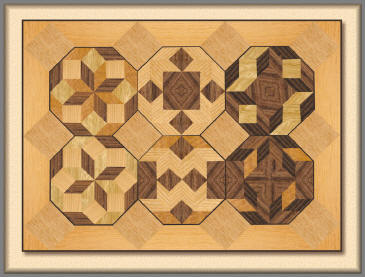
Fig 9:
Drawing the best square you can get through the tips of your
laid-out diamonds, plus a 'degree of averaging' for six octagons
can
get you to this patience-testing conglomerate!
|
|
|
|
|
Tutorials Menu
|
|

